
In this post I will build a repeating section in a simple PowerApp. You will be able to select an order and view/edit its details in a repeating section.
As a data source I will be using the AdventureWorksLT database on Azure SQL Database, but this will work with any data source such as SharePoint or CDS as long as you have two tables: OrderHeader and OrderDetail. OrderDetail should have a column pointing to a row of OrderHeader.
Create a new blank app (tablet layout) and connect your two tables as data sources.
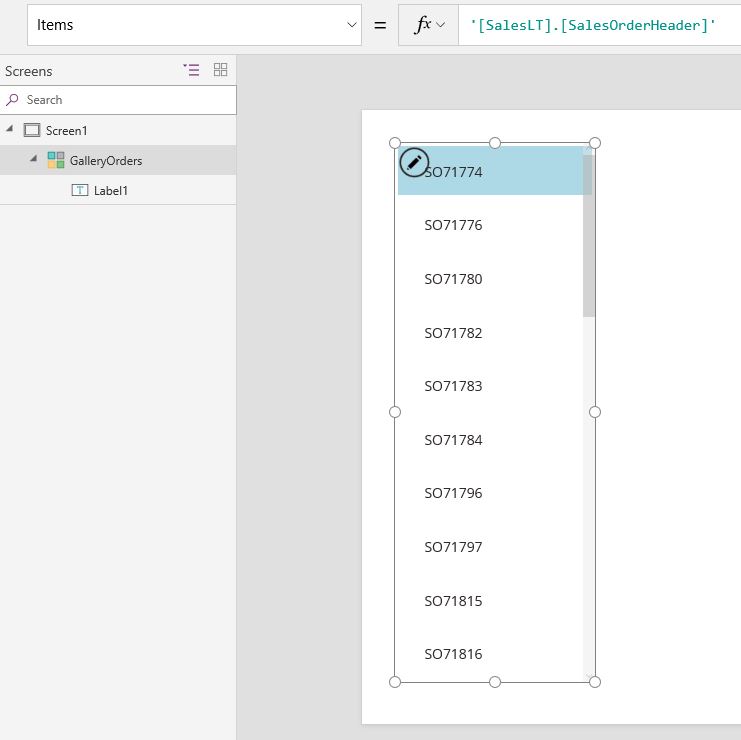
Insert a blank vertical gallery on the left side of the landing screen, rename it GalleryOrders and set its Items property to
'[SalesLT].[SalesOrderHeader]'
Set the gallery’s TemplateFill property to
If(ThisItem.IsSelected, LightBlue, RGBA(0, 0, 0, 0))
This will make the selected order show with a light blue background.
Insert a label in the gallery’s template and set its Text property to
ThisItem.SalesOrderNumber
Your app should now look something like this
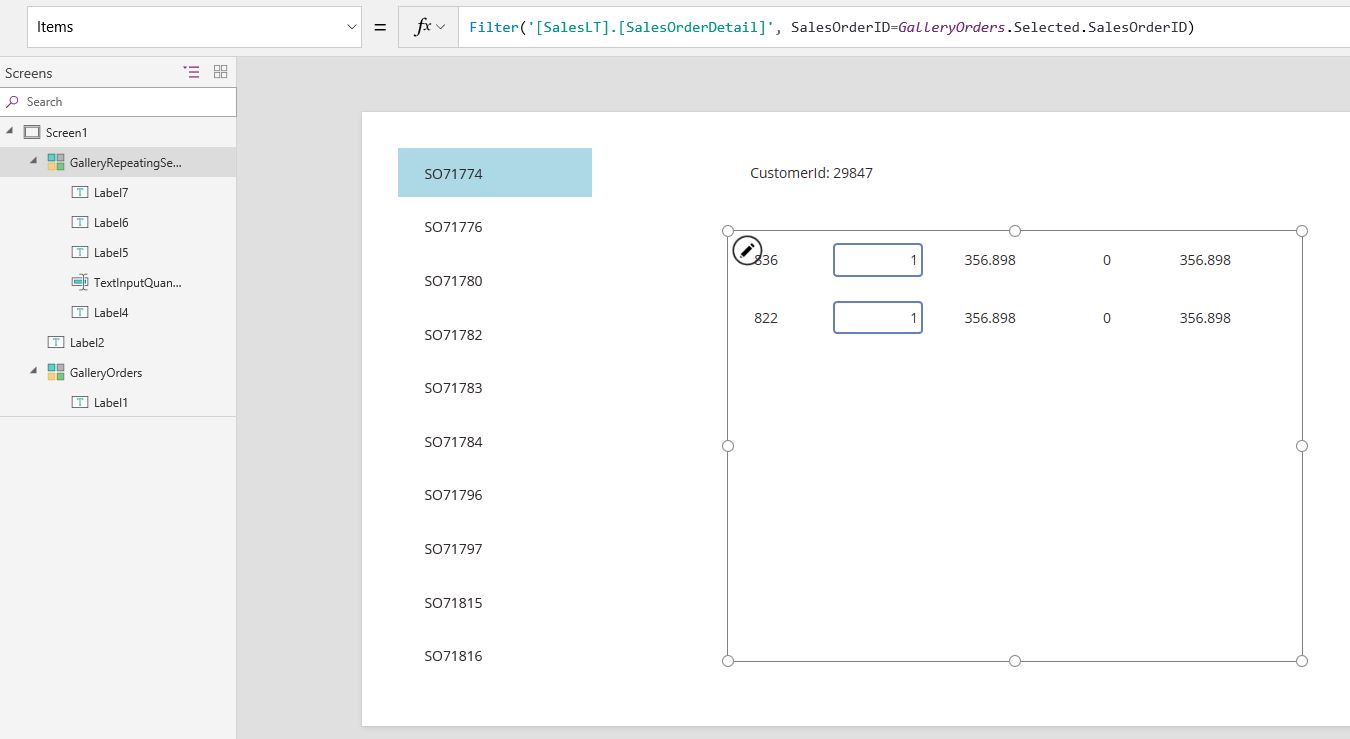
Let us now show the selected customer, so insert a label outside of the gallery and set its Text property to
"CustomerId: " & GalleryOrders.Selected.CustomerID
Insert another blank vertical gallery on the right side of the screen and rename it GalleryRepeatingSection. This is where the magic happens, set its Items property to
Filter('[SalesLT].[SalesOrderDetail]',
    SalesOrderID = GalleryOrders.Selected.SalesOrderID
    )
Insert a label in the gallery’s template and set its Text property to
ThisItem.ProductID
Insert a text input in the gallery’s template, change its name to TextInputQuantity and set its default property to
ThisItem.OrderQty
We are using a text input so that this can be edited, we will add the code to save edits later.
Then add another three labels in the gallery’s template with the following Text properties
ThisItem.UnitPrice

ThisItem.UnitPriceDiscount

ThisItem.LineTotal
Your app should now look something like this
Now we can start to have fun. In order to modify the data in the SalesOrderDetails table we need the following for the OnChange property of the text input
Patch('[SalesLT].[SalesOrderDetail]',
    ThisItem,
    {OrderQty: Value(TextInputQuantity.Text)}
    )
Now you can run the app and see what happens when you change the quantity of an order line. After a short delay, the line total should change to reflect the new quantity. This means that the changed data has been recorded in the database.
In order to show the total for the selected order, you can place a label outside the gallery and set its Text property to
Text(
    Sum(
        GalleryRepeatingSection.AllItems,
        LineTotal
        ),
    "#,##0.00"
    )
This is just a basic framework to demonstrate how to create a repeating section, and you can build on this to add all the functionality required by your business process.
For example, you may want to be able to delete an order detail row. To do this, simply insert a trash icon to GalleryOrderDetail’s template and set its OnSelect property to
Remove('[SalesLT].[SalesOrderDetail]', ThisItem)
Or you can add edit/save etc. buttons like I do in my post on creating you own forms.
I hope this has been useful and welcome any comments or suggestions.
Excellent . thanks very much . This will come in handy replacing standard forms like PO entry.